Azusa Mini Bike + Predator 212 + Minor Customization = Fast Fun
Author: tracysigler | Posted: March 3rd, 2016 | | 19 Comments »
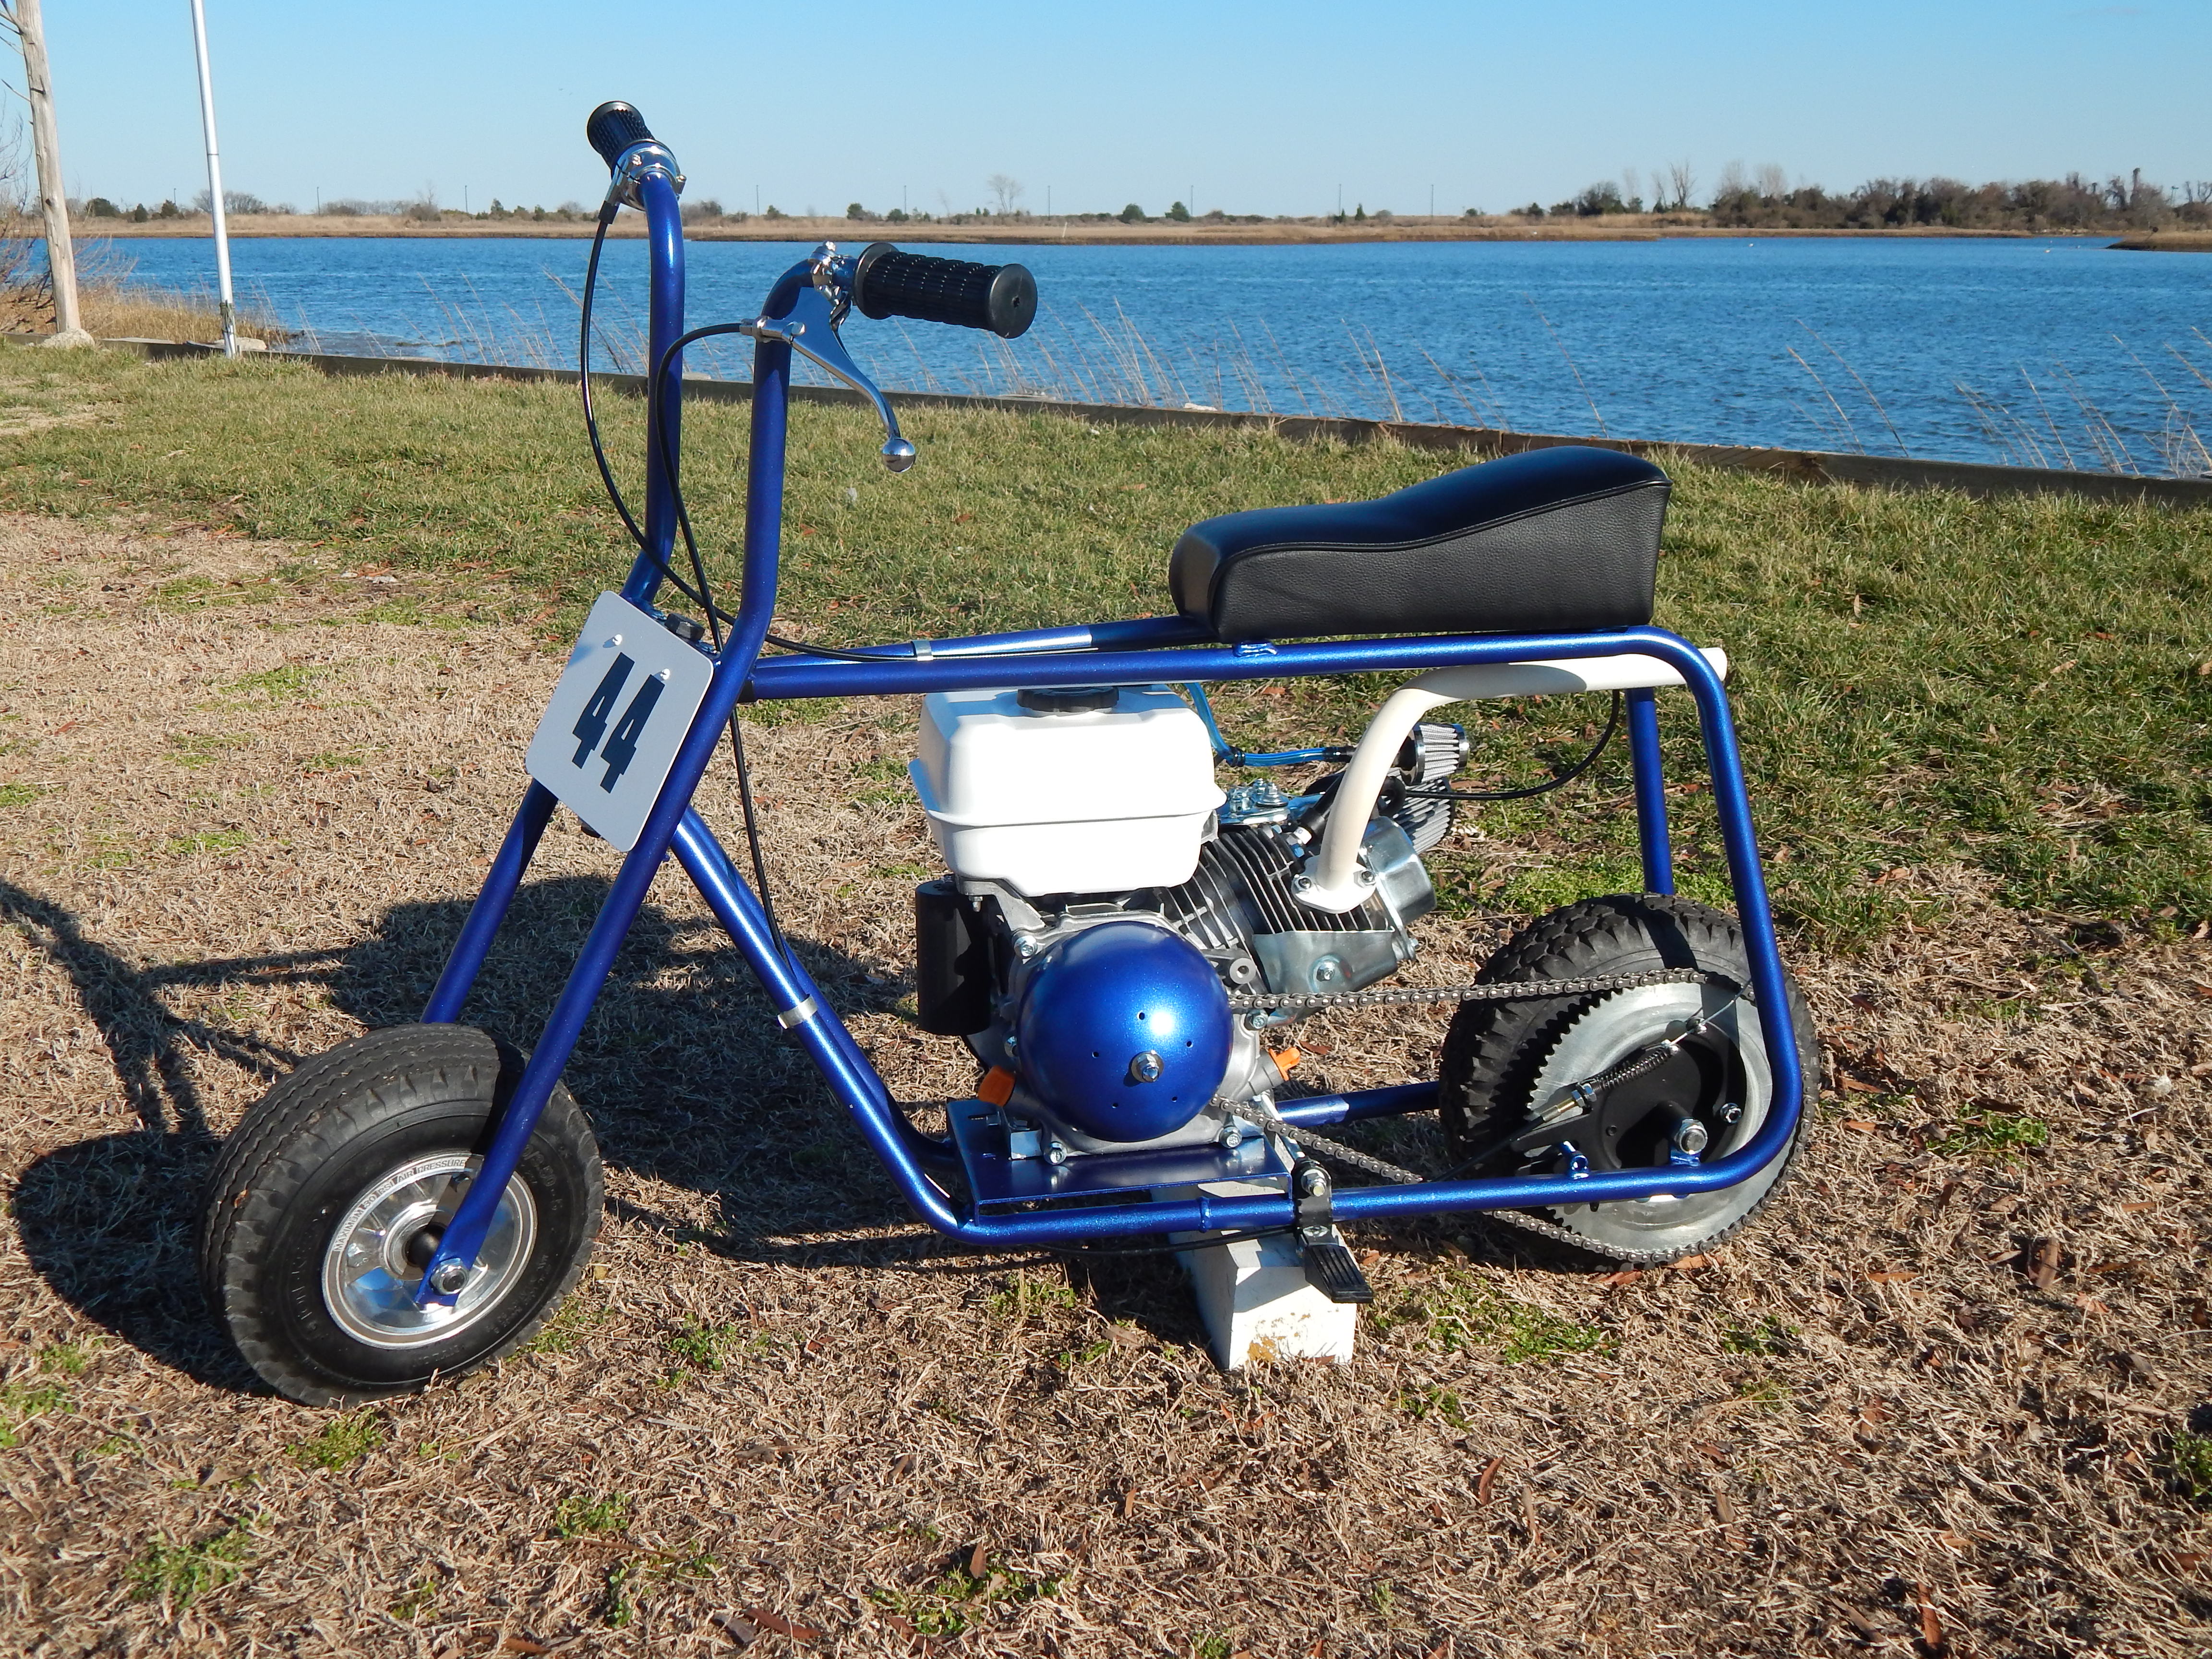
I built this mini bike using an Azusa kit and a Predator 212 engine. I don’t think I’ll ever buy another Azusa frame set. As someone who used to weld and fabricate for a living I think I can objectively say that the build quality on the frame is not great. Sure, the welds are strong and I have no concerns about it breaking. But the engine plate wasn’t square with the frame, the pin for the fork on the drum brake had to be cut down because collided with the sprocket, and the head tube for the fork had distorted from welding and I had to ream it out just to get the bolt through. Weld spatter and burrs are not a big deal but the structural problems were disappointing. I made it work though.
The design theme is a tribute to my father. I have never known anyone who is such a hard core DIYer as my Dad, except for his father, and my younger brother. From cars to houses to furniture and art projects. Dad just goes for it. Actually, my Mom is the same way. So I got the “do it” gene from both sides.
Various custom touches are detailed below. This video also lets you hear how the Predator engine with a straight header sounds. No wheelies were performed in this video. But this little scooter will pull the wheel up with ease. The first time I rode it the front wheel was a foot in the air before I noticed. Hang on.
Left side view shows off the clutch cover I made. Also, I blacked out the drum brake (and foot peg clips) to help break up all the silver at the rear wheel.
I used an old lamp to make the clutch cover. I’ve been hanging on to this old floor lamp I got from a neighbor YEARS ago. Obviously I was never going to get around to restoring it. Mini bike calling…
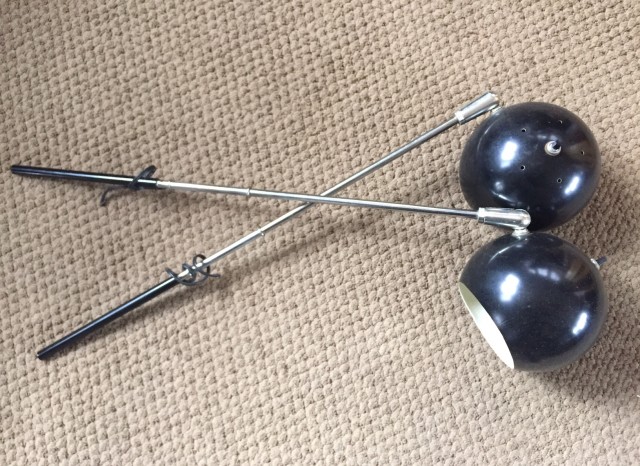
I sectioned about an inch out of the lamp ball and then notched it for the chain. I already had one of the common cheap chrome clutch guards so I modified that by chopping it down the corners so I could use it as a bracket. I then bent some flat bar to make an arm to hold the ball. It’s pretty solid and doesn’t vibrate or shake. As far as repurposing objects I’ve definitely been inspired by the work of Jeep2003 on Youtube, and the OMB forums.
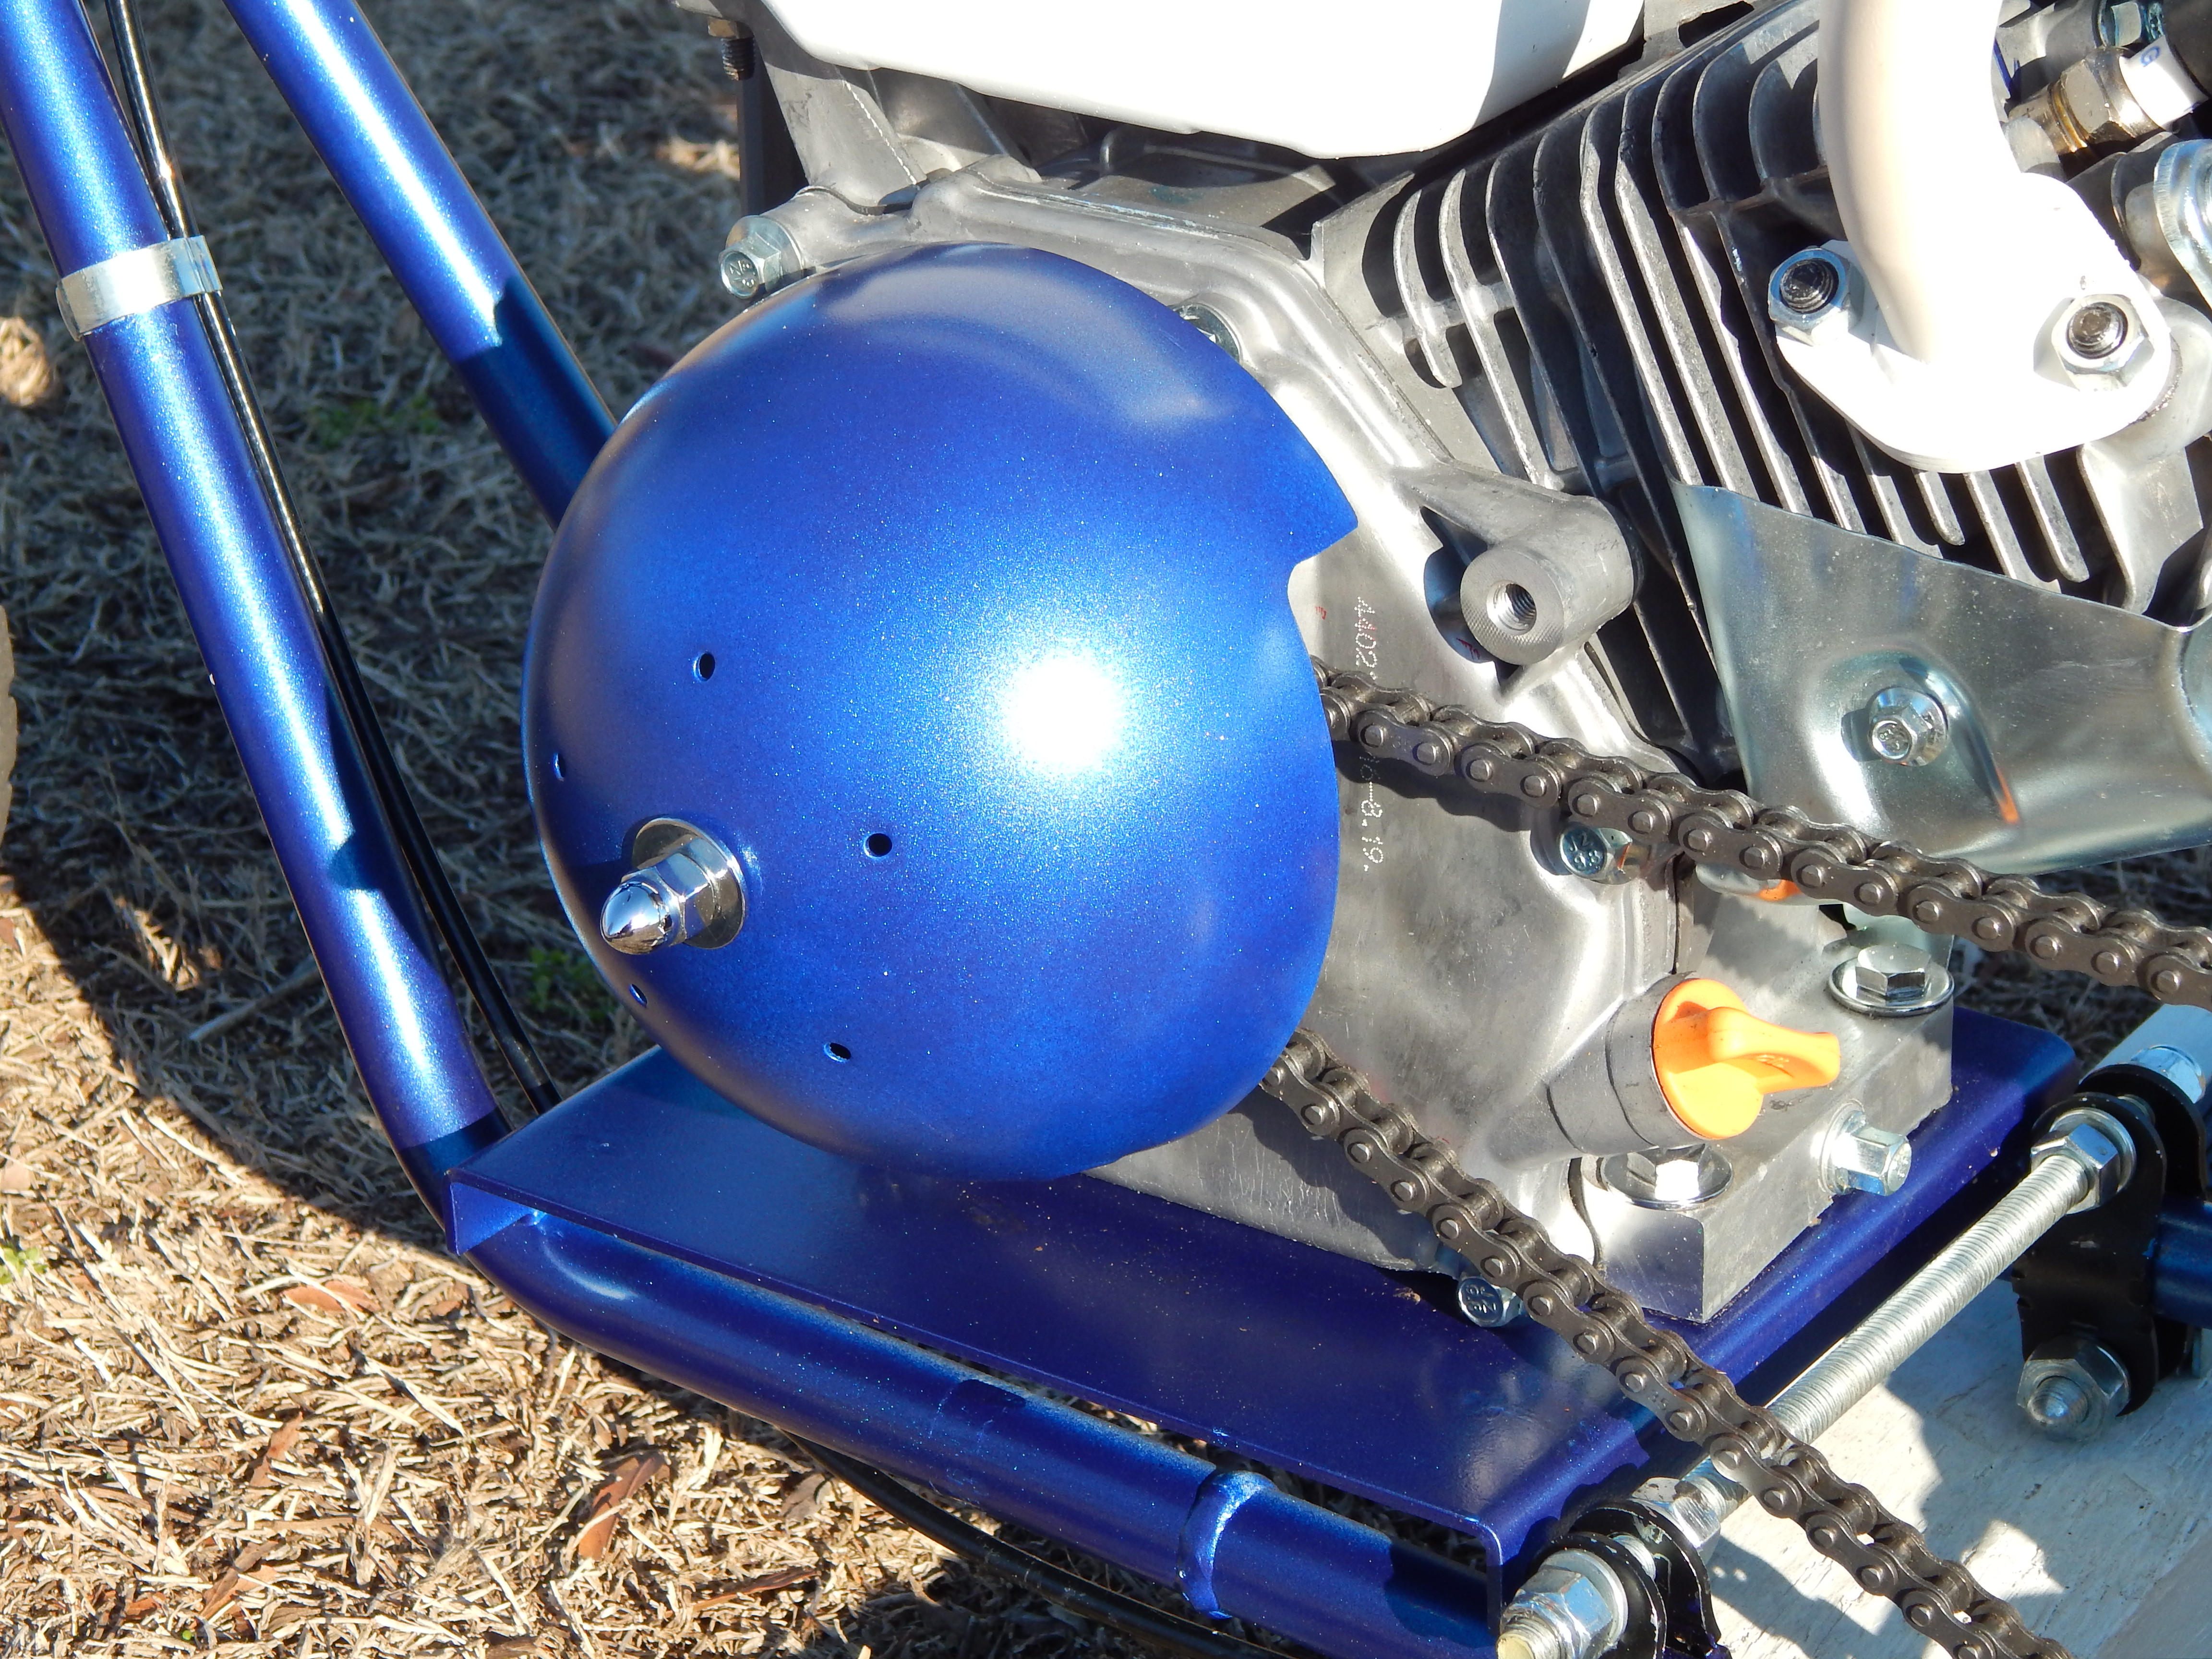
I think the bulbous clutch cover helps to visually balance out the offset of the Predator engine.
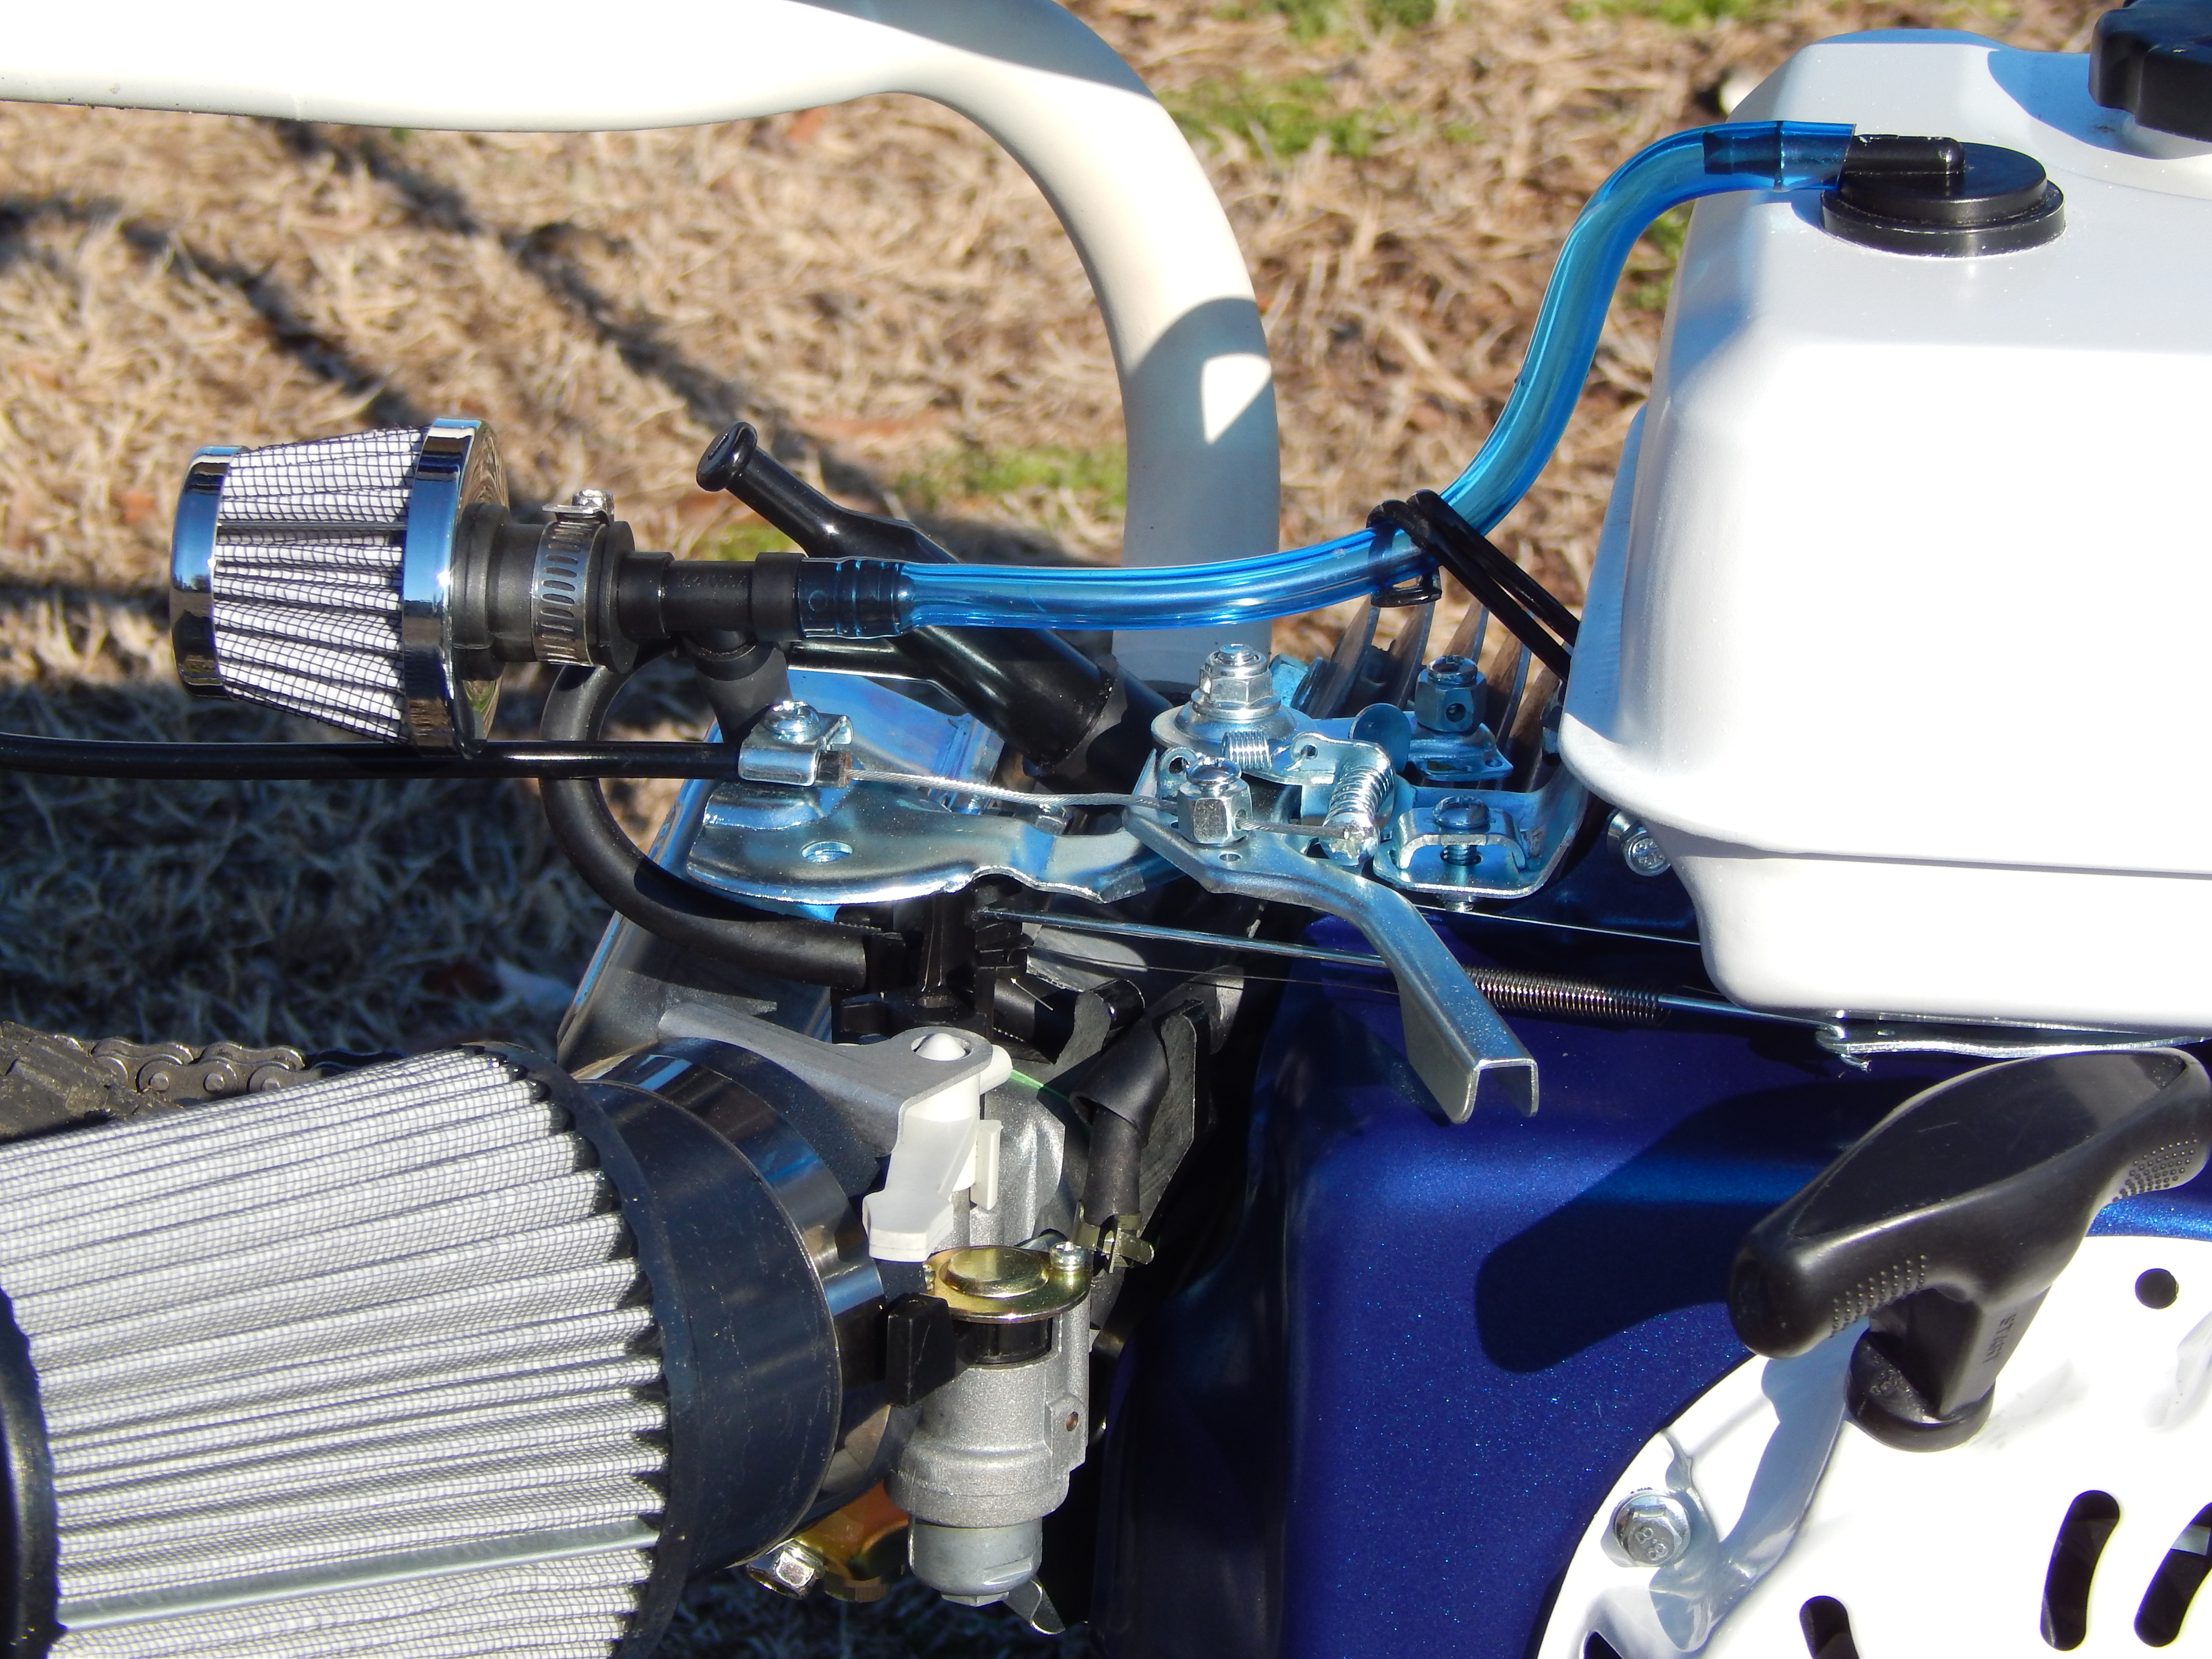
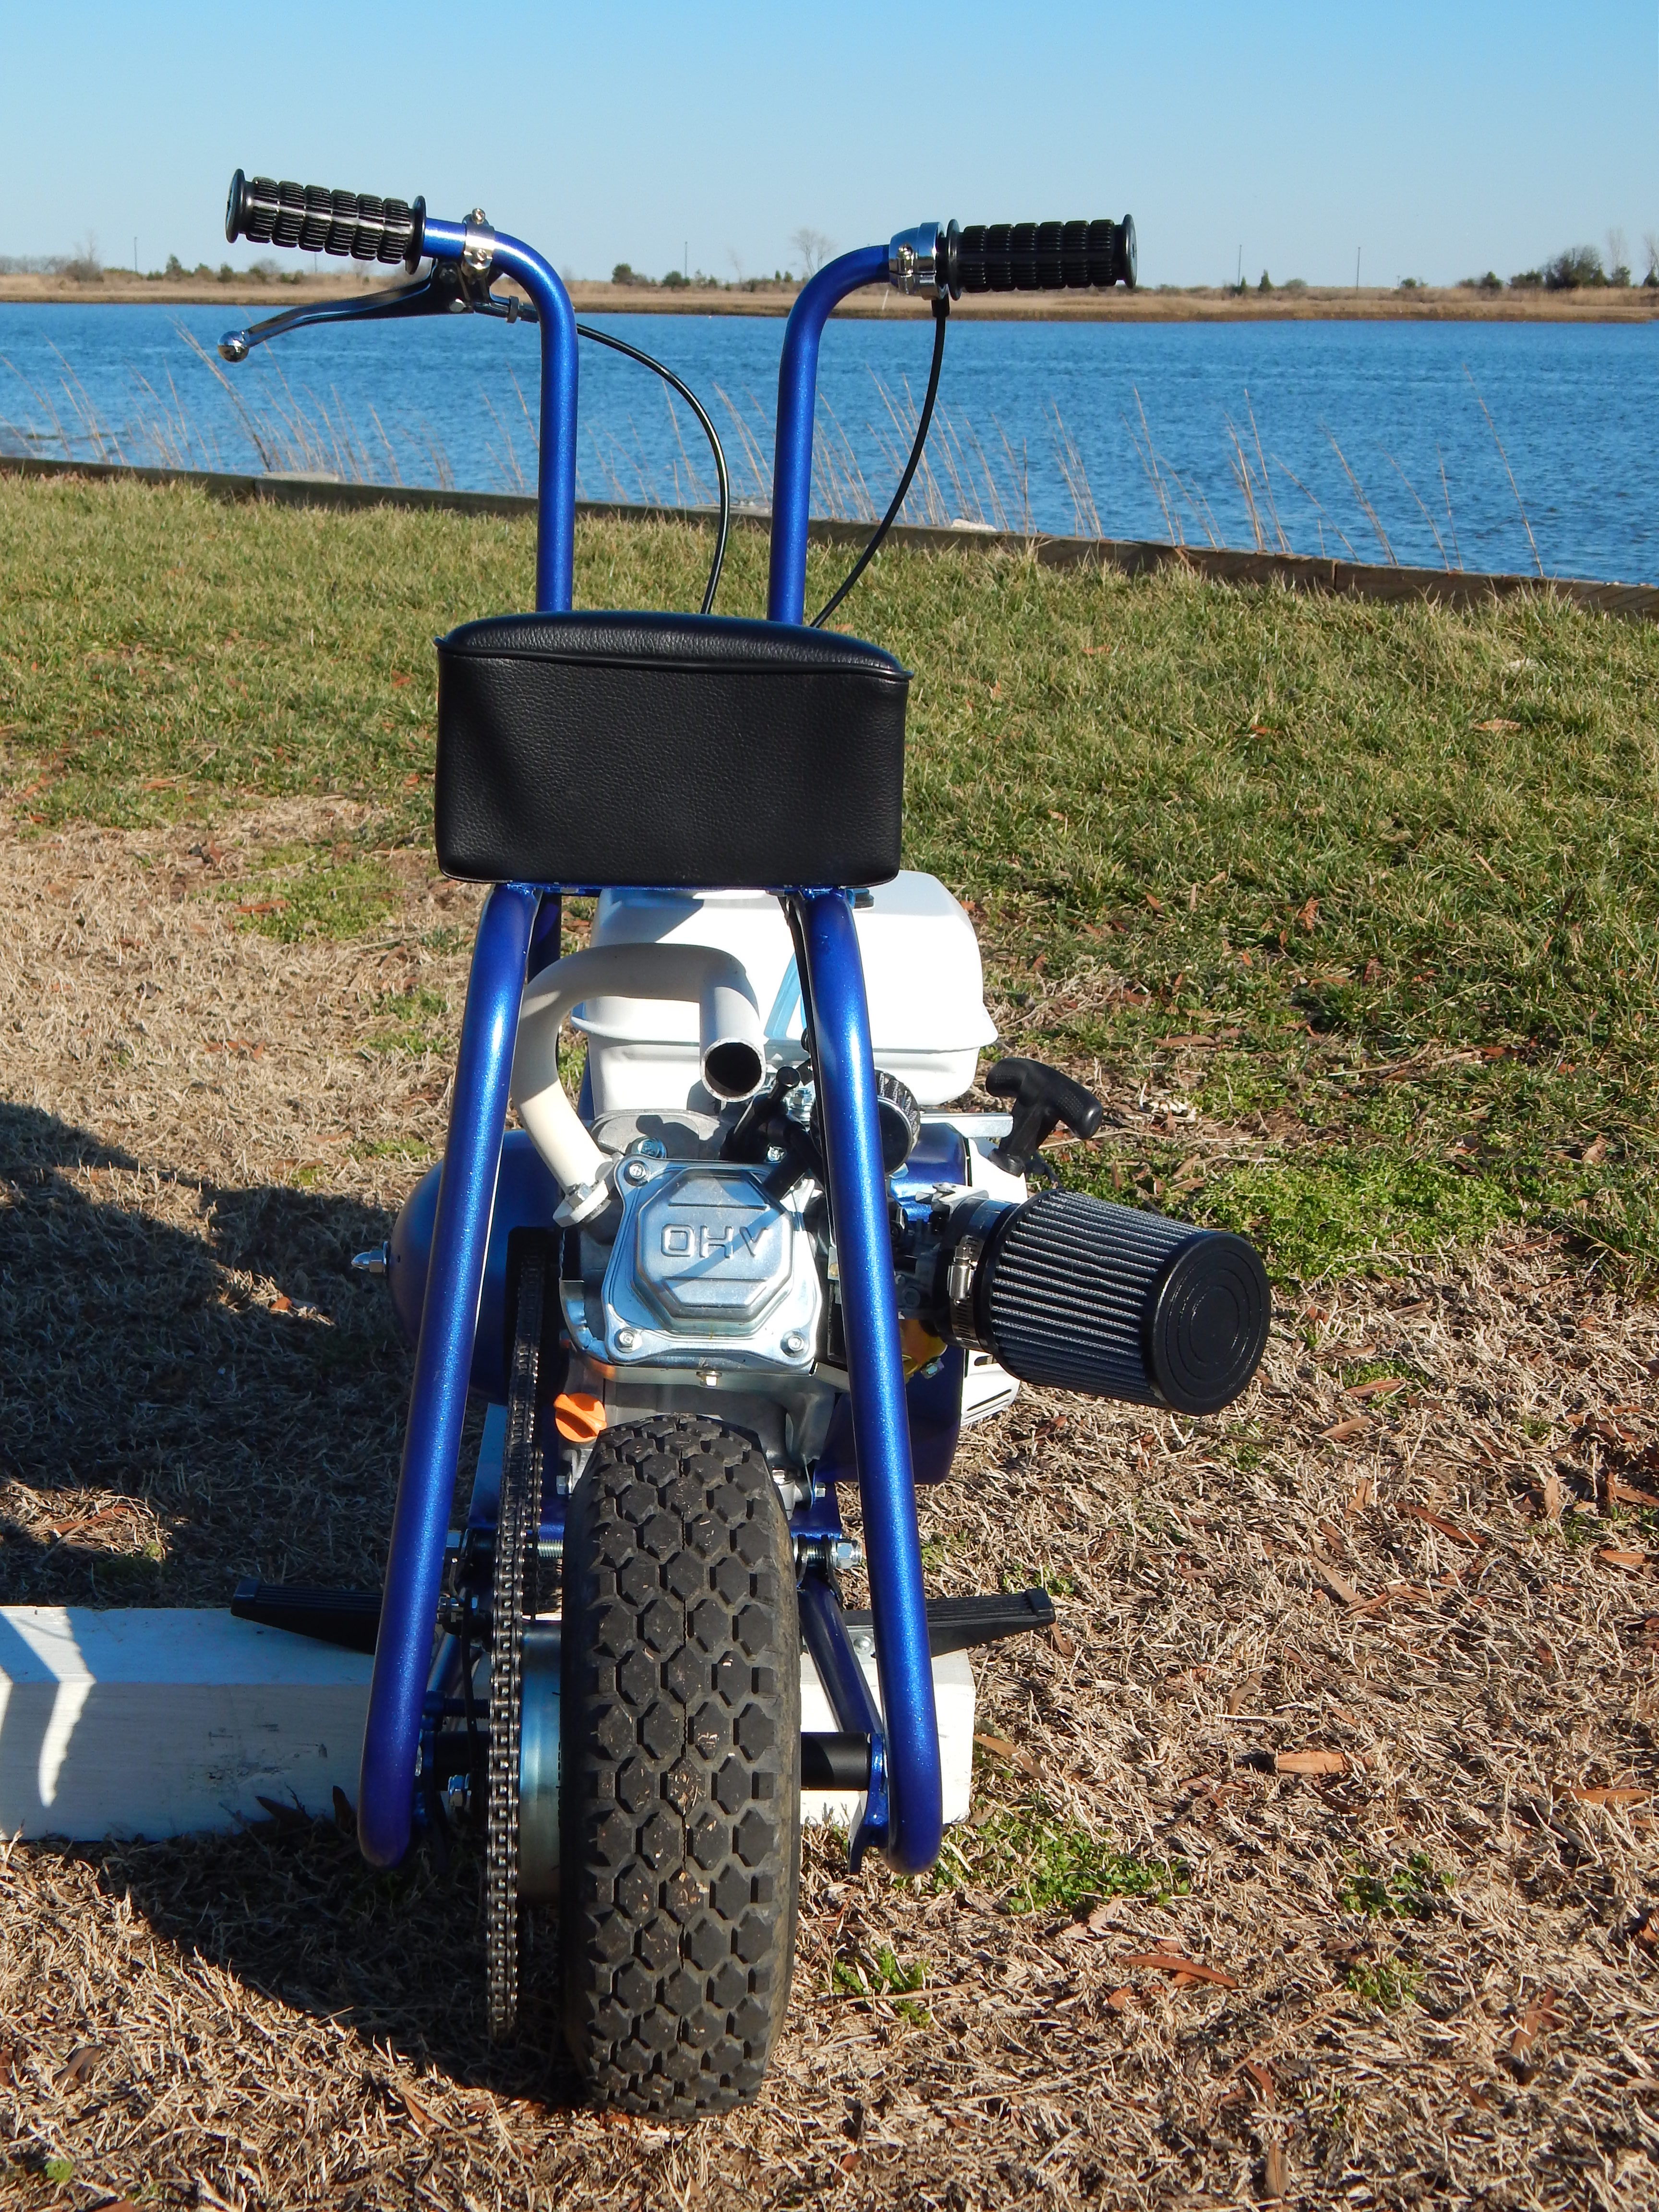
This Predator engine is pretty ugly overall. I tried to fix that some by painting various parts, but that still left the big plastic air filter box. I thought about modifying that but eventually went the easy route with a filter upgrade, which also meant rejetting the carb and upgrading the emulsion tube. The gas tank and valve cover both vent to the stock filter box. Reading the forums at OldMiniBikes.com I saw that guys with a similar set up used a small breather filter to address this. I put a tee fitting into the original hose from the valve cover so I could also use it to vent the gas tank. I cut the hoses in a way that would position it straight back so it looked tidy.
Because the exhaust is visible here I’ll mention that I sprayed that with VHT White and it’s holding up great. I’ve always loved white headers from the 1960s drag cars and some hot rods.
Dad had a Gulf service station in the early 1970s. The young mechanic in this photo is a guy that worked for my father.
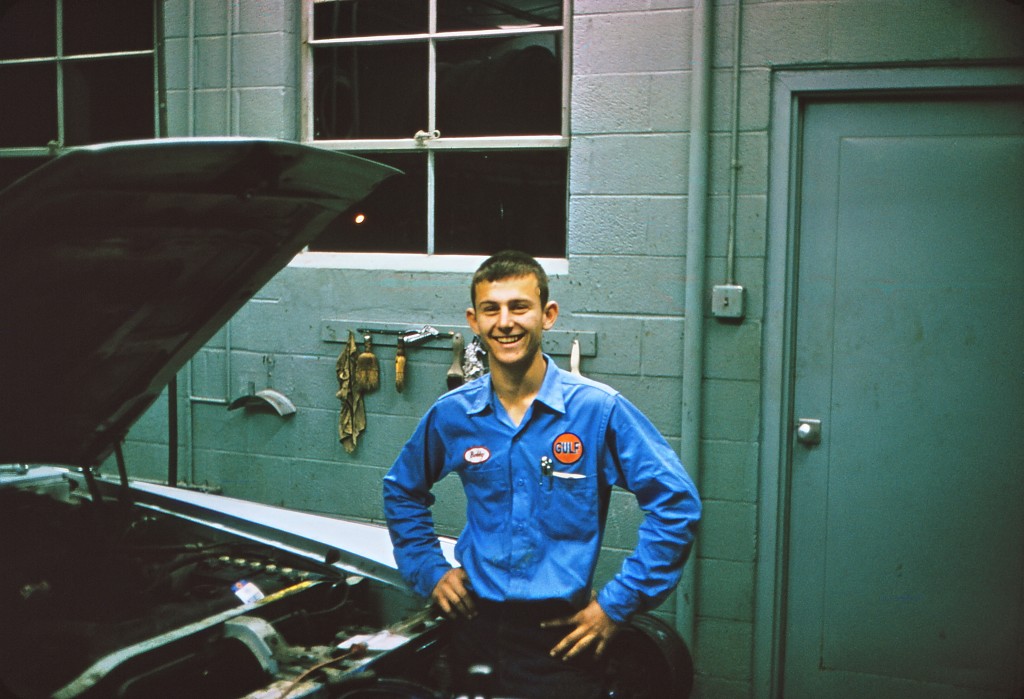
So I had to add a Gulf sticker to the starter cover. I found it on eBay. Originally I thought about going with the classic Gulf racing livery of light blue and orange. I love that, but I also see a lot on project cars. Plus, this medium blue metallic was calling my name at the hardware store.

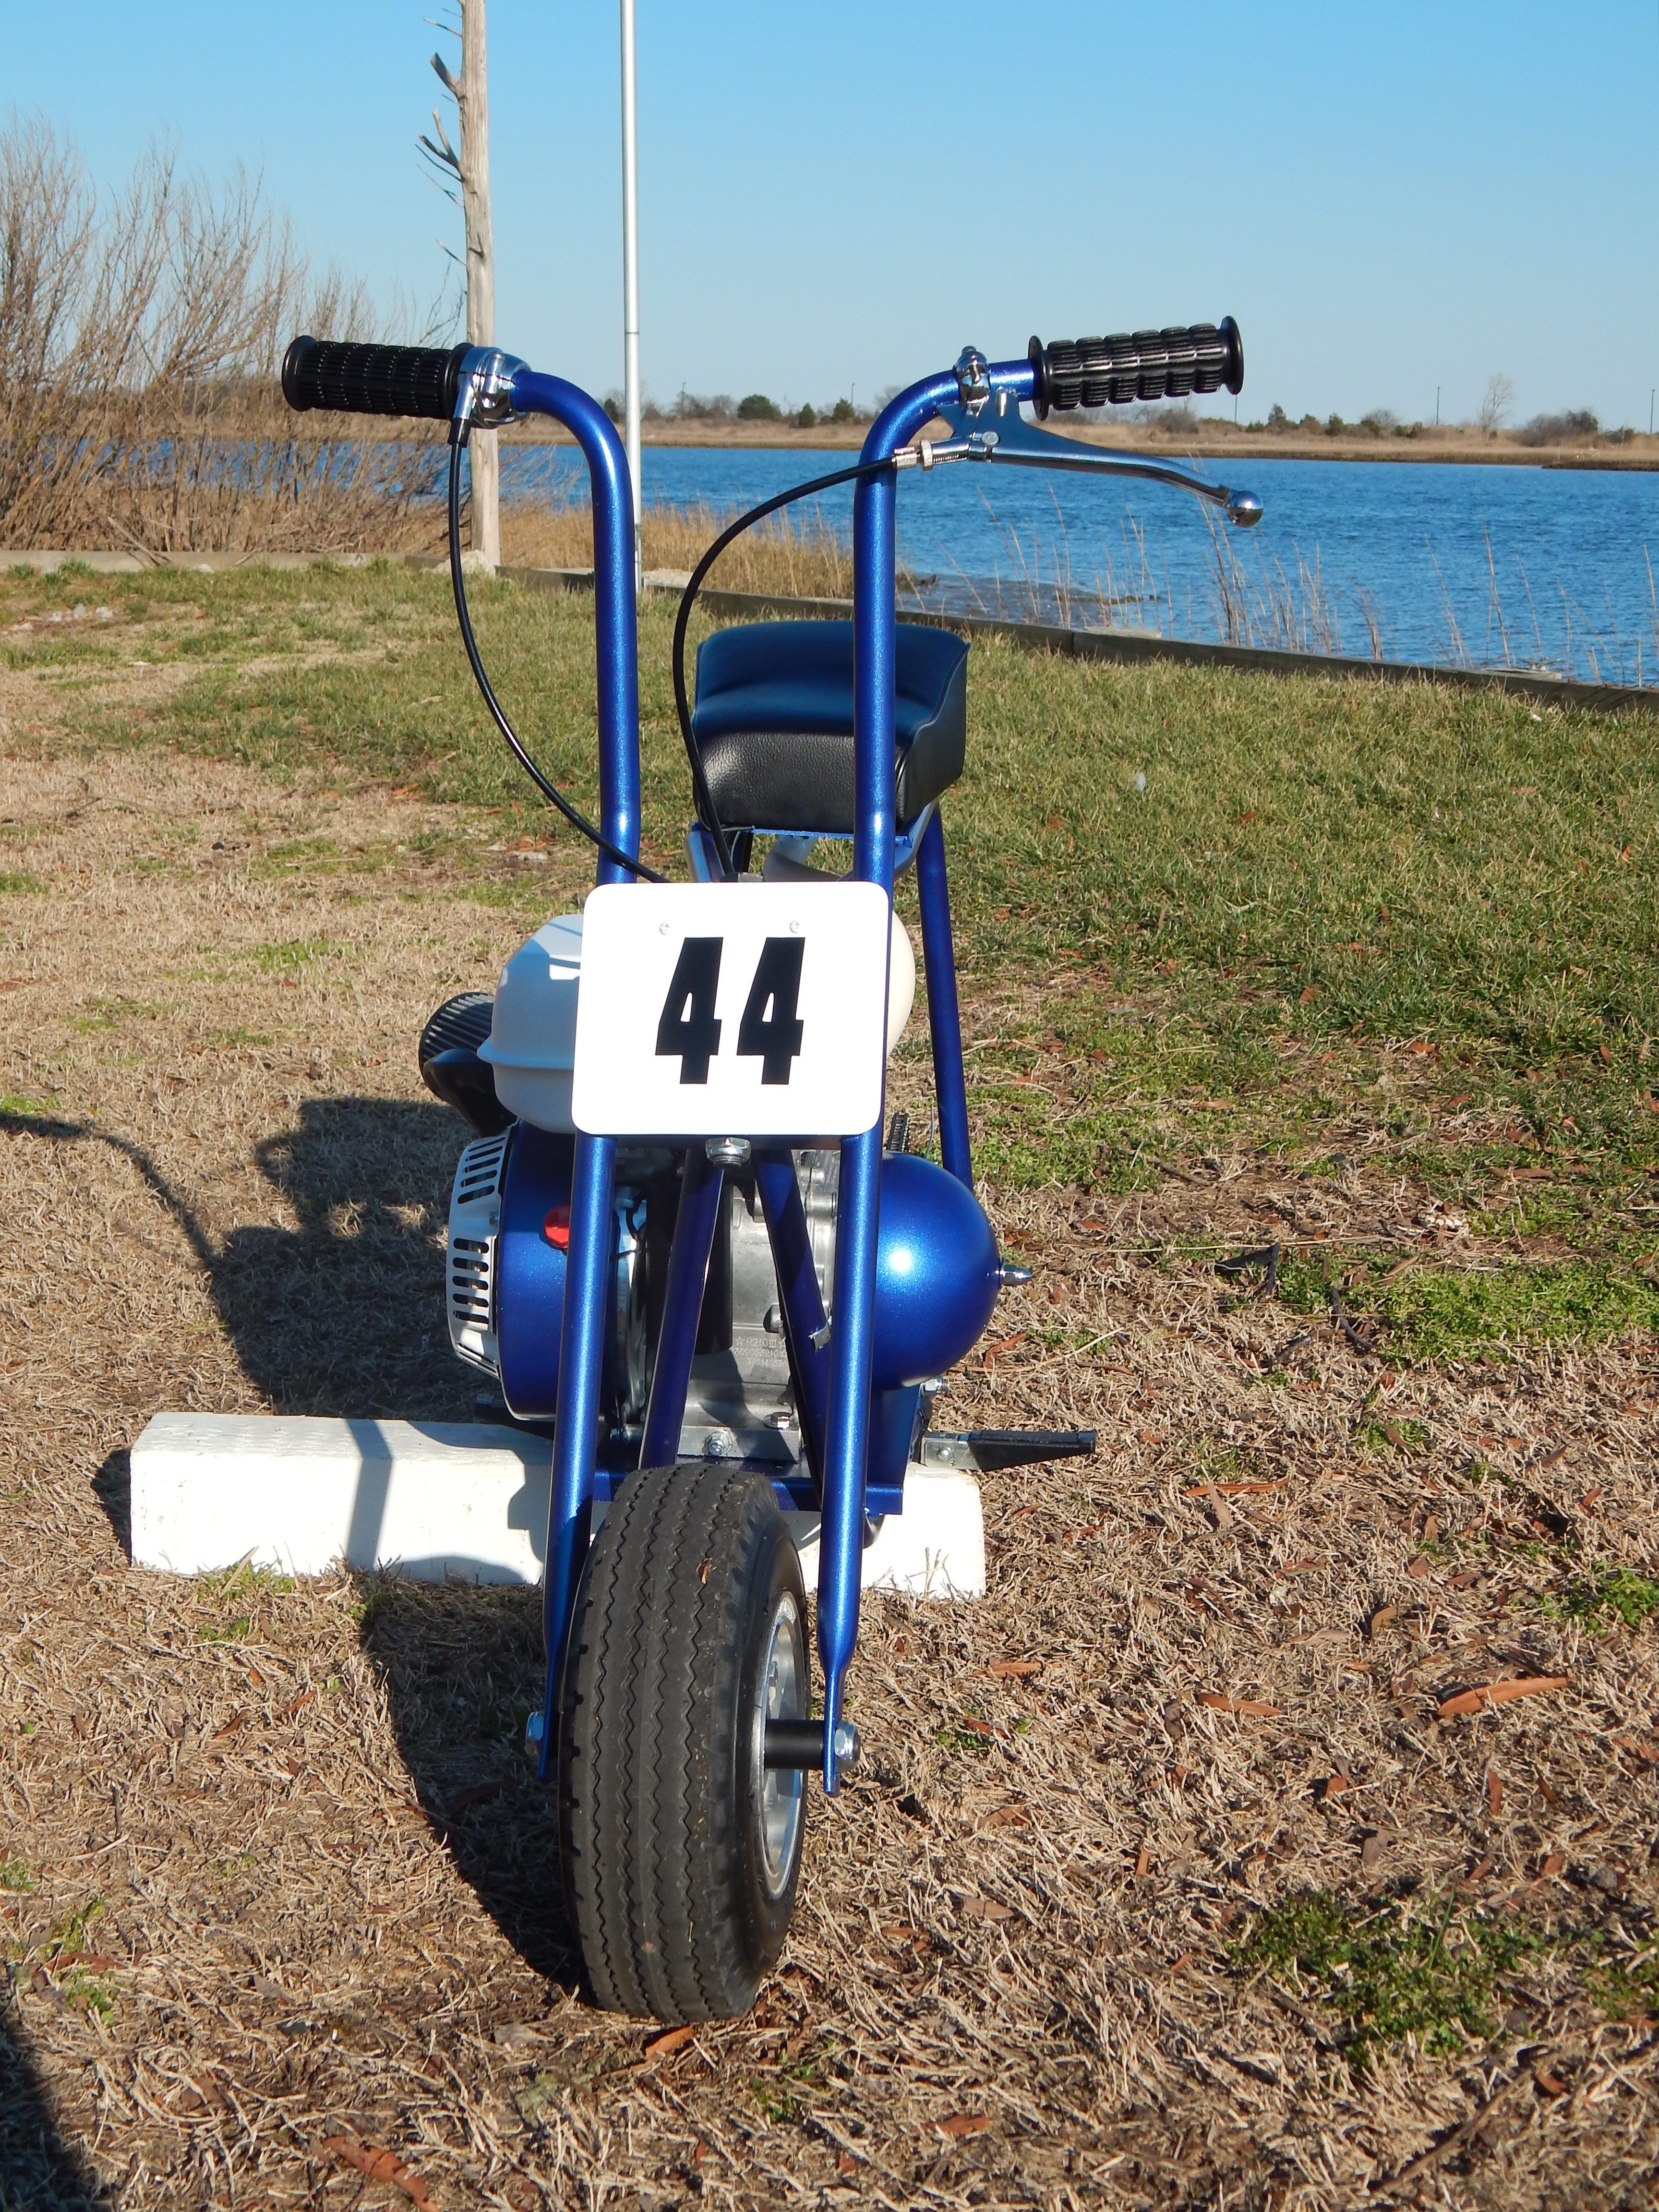
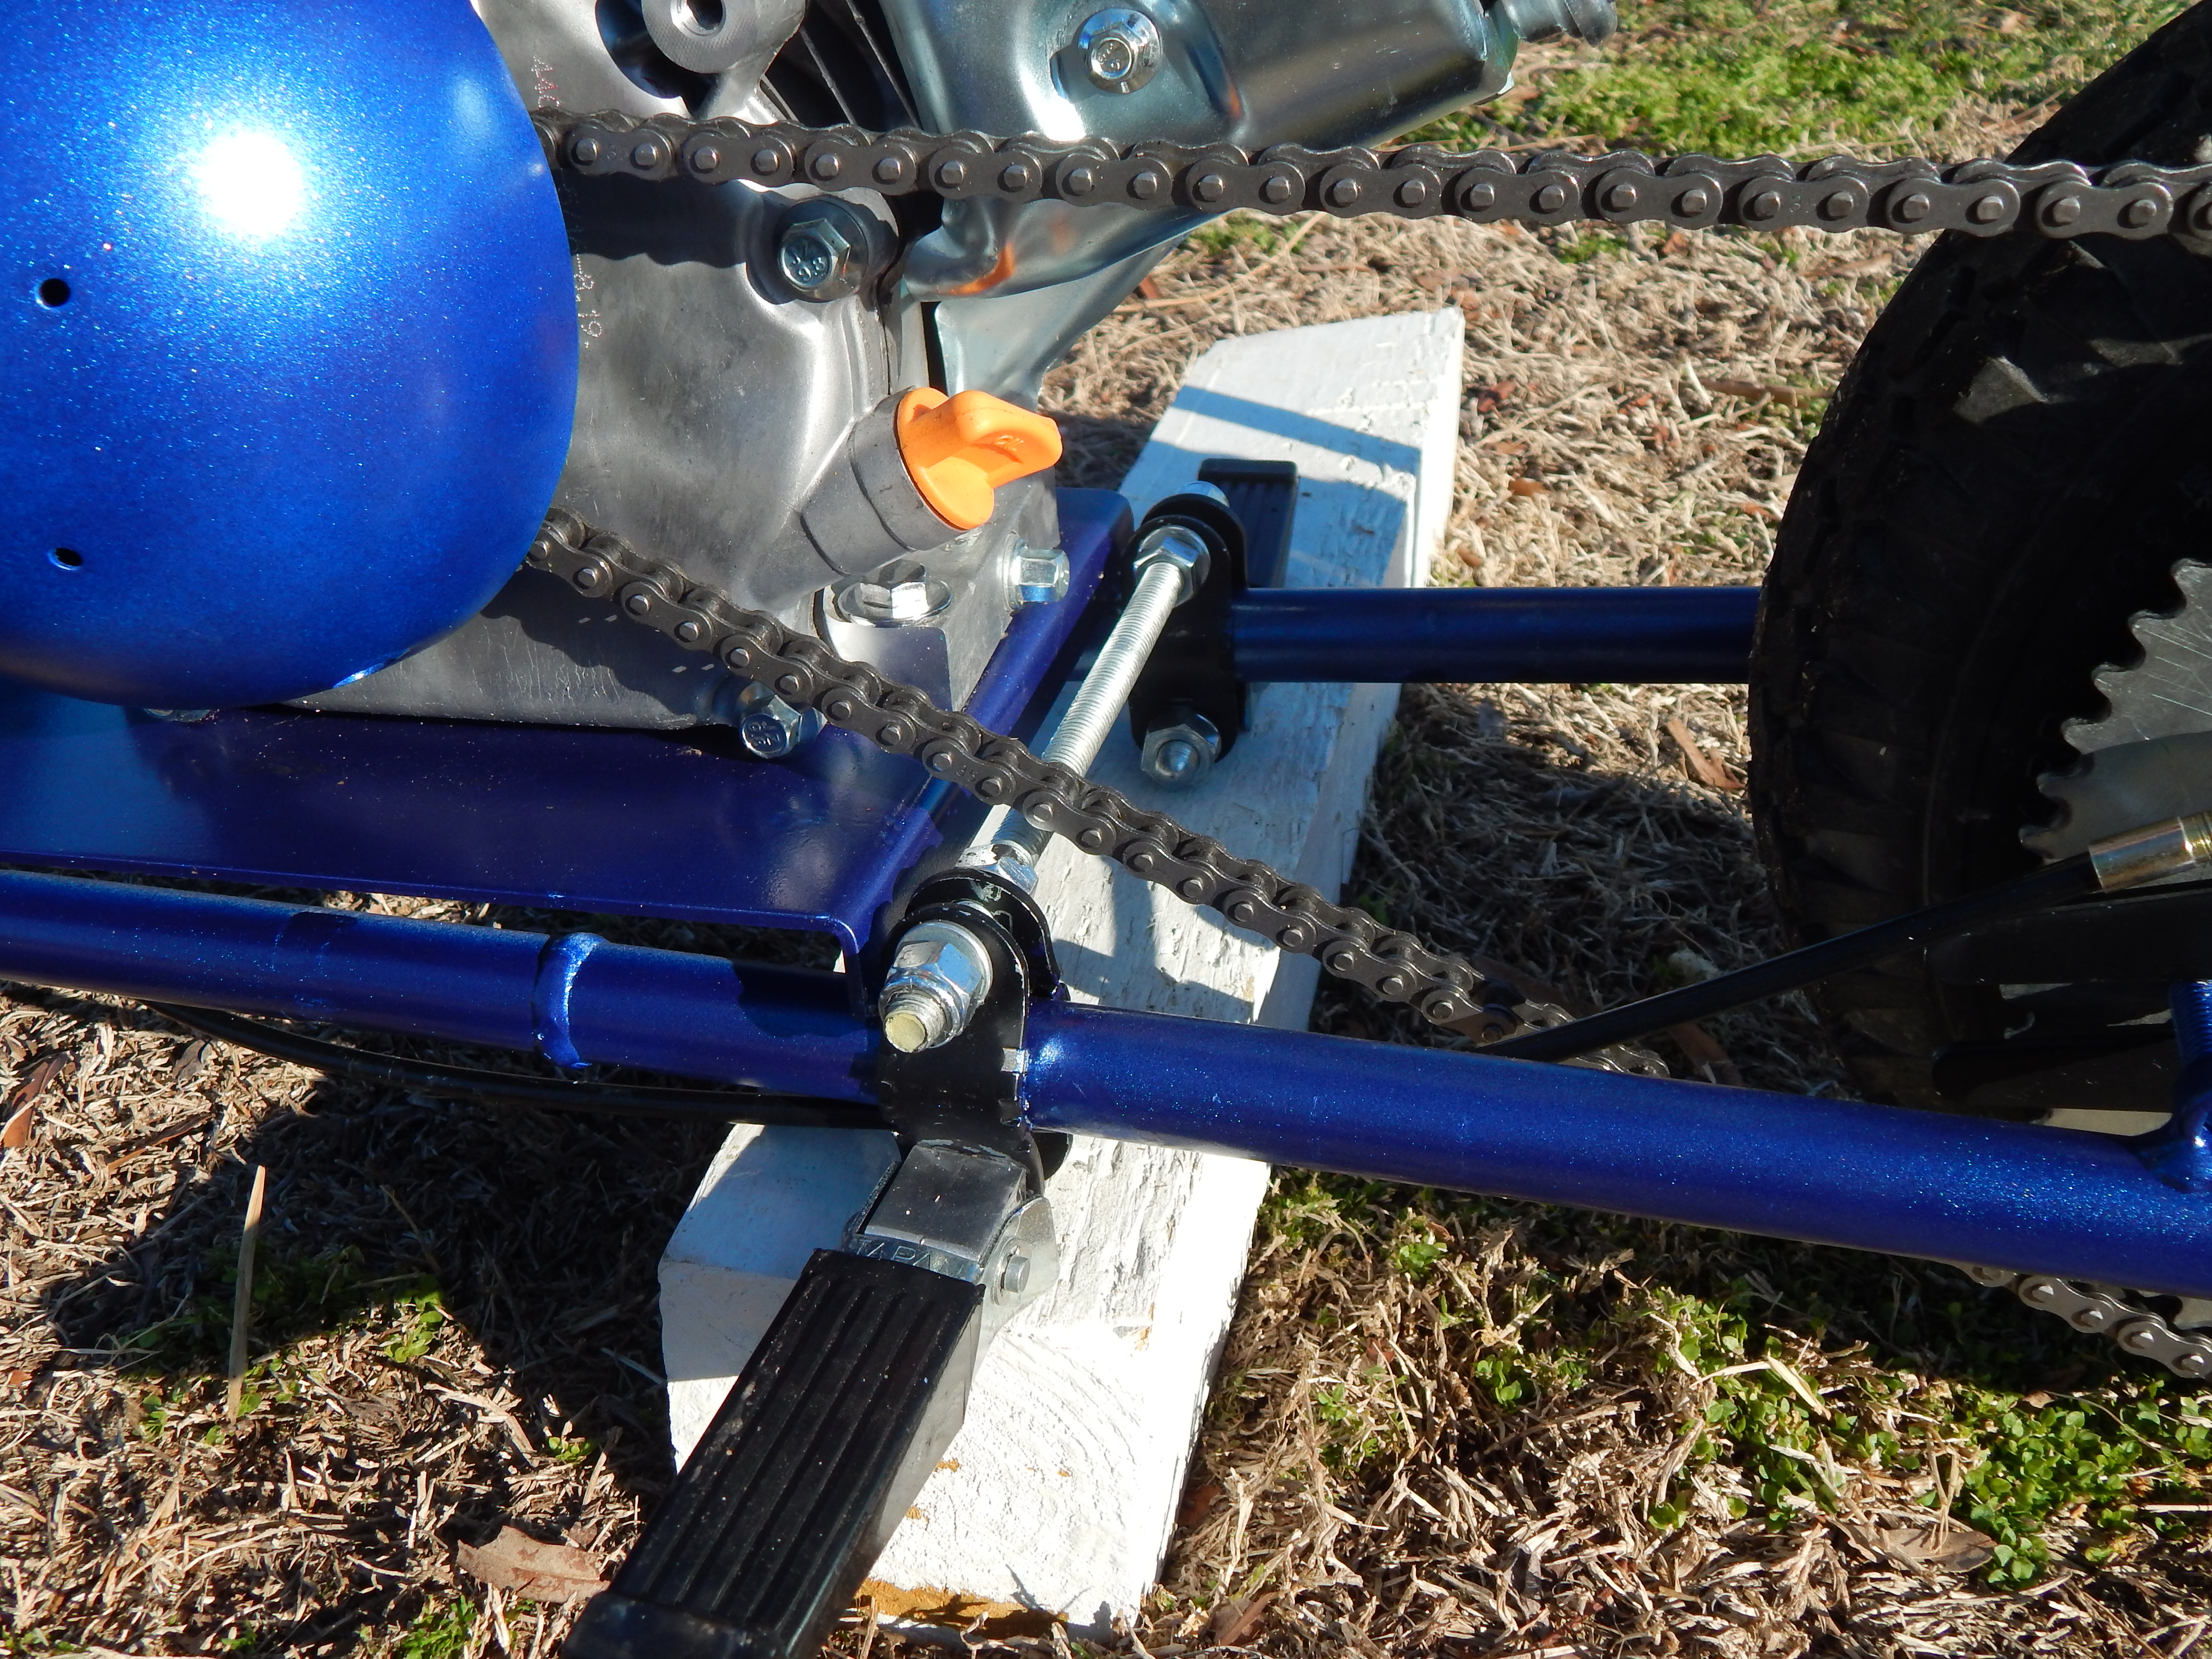
The foot pegs with Azusa mini bike kit, in my experience, don’t work well. I had them tight enough that the clips were deformed and they still couldn’t take much weight without slipping. I got a piece of all-thread to replace the bolts, and used locknuts on both sides of the clips. Problem solved.
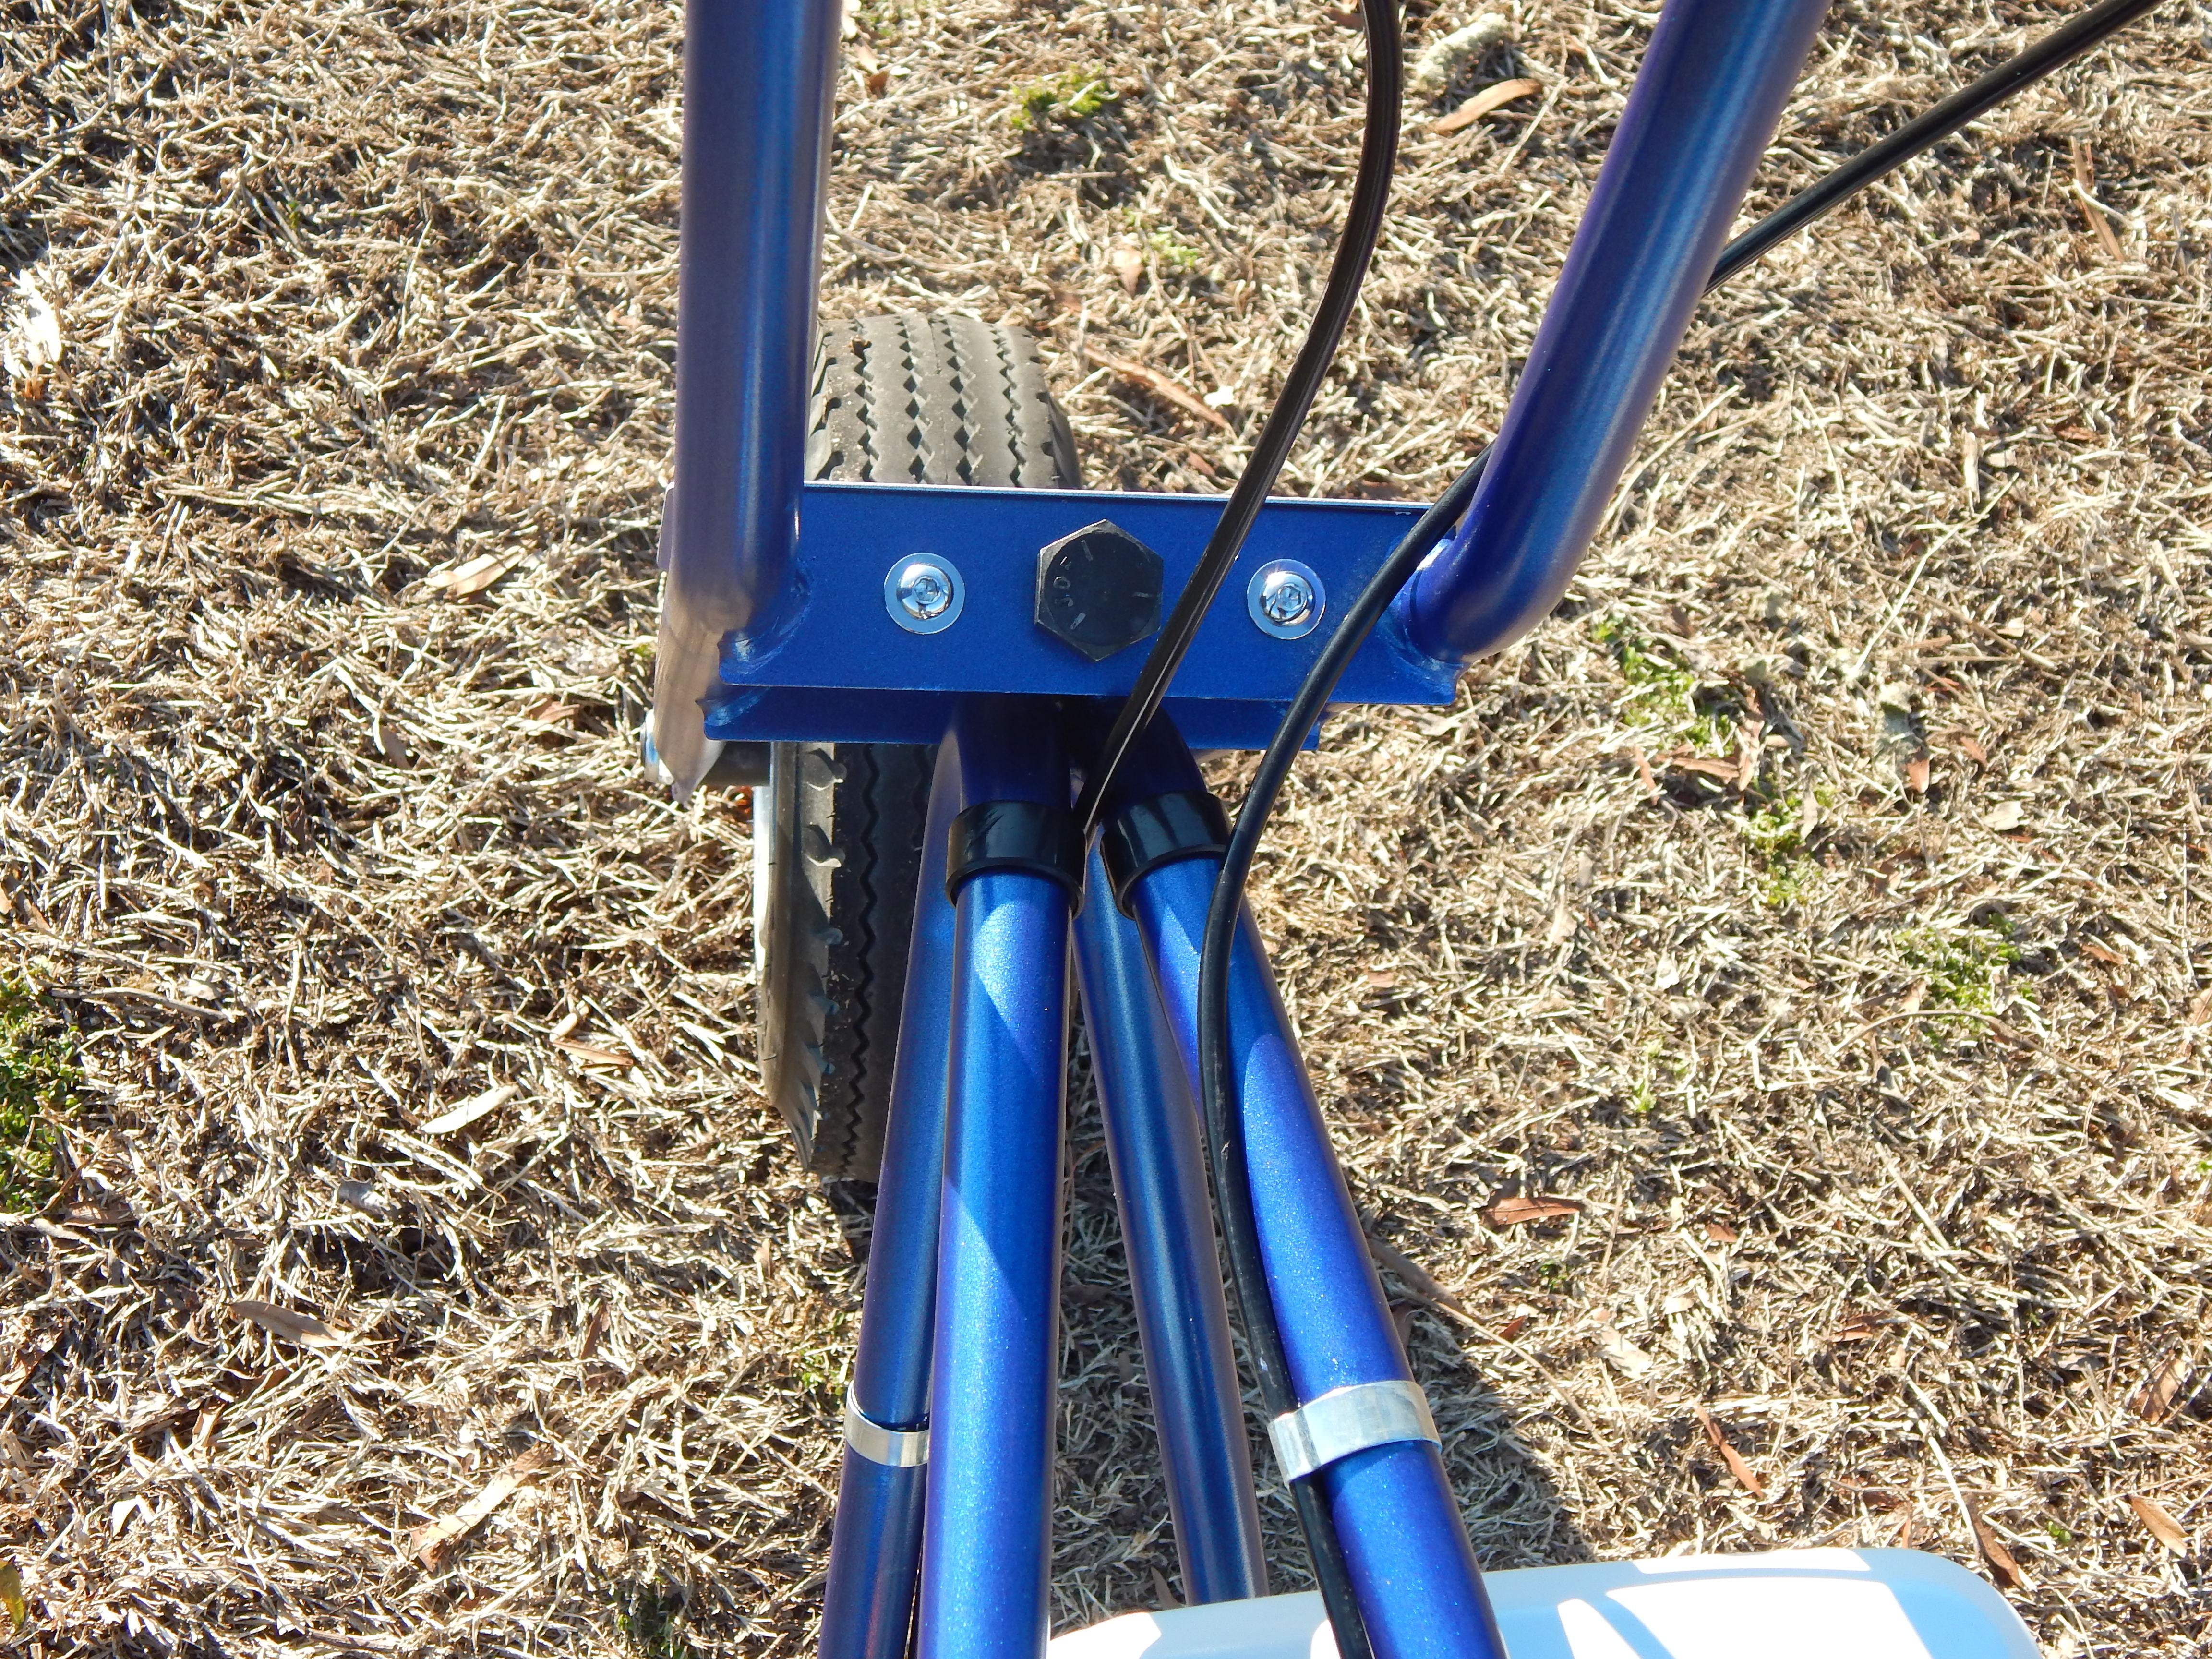
The Azusa frame and fork bang into each when you turn full lock. I made some handlebar bumpers from 7/8″ plastic furniture feet. I cut out the bottom, leaving a plastic ring. Then I cut that into and attached it to the frame with some strong double stick tape. Seems to be holding up.
Also, I tried routing the cables a number of ways but this ending working the best. I adjusted things so the cables don’t rub the paint off or kink up. Without a number plate going through that space would be a good option.
I knew I wanted a number plate with “44” because that’s the year my Dad was born. At first I thought I would use a vintage BMX plate but they are just too big. I made this one with a piece of steel sheet metal, some small angle brackets, and polished allen bolts up top. I radiused the corners to match the diameter of the frame tubes, you know, so it flows. Finding cool looking numbers was not easy. I was on the verge of making my own when I found these boat numbers. They’re not as funky as I wanted but I think they have a little flavor.

The low oil sensor and some other wires hanging off the front of the Predator 212 engine are an eyesore. I found an old plastic soccer ball pump in the attic and decided it now had a higher calling. I chopped off a third of it, got rid of the plunger and needle, cut a slot up the back, and hung it on small aluminum bracket I fabbed up.

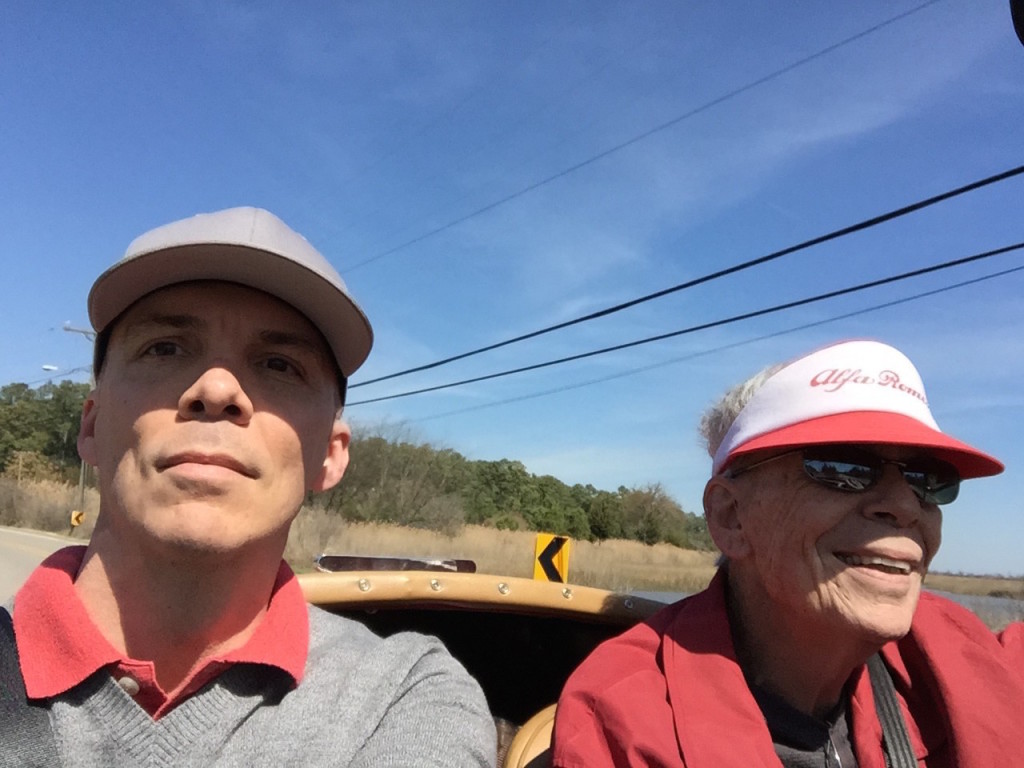
Dad and me in his 1958 MGA. This was a good day. We’ve had a lot of them. If I’m a resourceful person at all, Dad is the major reason for that. There were no lessons, just leading by example. I hope I’ve done the same for my kids.
Thanks for reading.

Hey
You have got a really nice bike! I love your built and I’m making a similar one from an azusa mini bike kit.
I’m wondering where you have got the small air filter on your valve cover from.
Thank you for your help!
Hey Sebastian, There’s a link in the blog post to see it at Amazon US. This brand makes them in a variety of colors.
http://www.amazon.com/gp/product/B00062ZING/ref=as_li_qf_sp_asin_il_tl?ie=UTF8&camp=1789&creative=9325&creativeASIN=B00062ZING&linkCode=as2&tag=tsig-20&linkId=UWOJ4FPGWYVLFZXN
I actually got mine from a local O’Reilly’s auto parts store. After looking all over the store I found it in the “performance” section.
Thanks for your note and good luck with you mini bike!
T
Hi Tracy. In the final stages of building my OMB/Azusa minibike. Similar to yours. I really enjoyed your video and stills with more details. I’m also digging your frankness about you and your father. I’m sure he would ride your mini, if he can.
And I’m glad to hear that I’ll have enough power with the Predator 212cc to pop wheelies if I don’t pay attention.
Have a great Summer.
e
Hey Eric, You will definitely have plenty of power and torque even with the engine completely stock. The air filer upgrade, bigger jet in the carb, and straight exhaust pipe certainly added some more. I haven’t figured out what the top end speed is yet, but it’s enough to go into a speed wobble if you’re not careful. I didn’t remove the governor.
Dad got to see and hear the bike a couple months ago. He passed away last week after a long battle with cancer.
Thanks for your note.
Glad to hear there is still people out there to appreciate there father like this and still have fun!
Where did you get the t from for your small air filter and gas line ?
Sorry Andrew. For some reason I didn’t get a notification about your comment. The filter you can get at Amazon, but I got mine at the auto parts store in the “performance” section.
https://www.amazon.com/gp/product/B00062ZING/ref=as_li_qf_sp_asin_il_tl?ie=UTF8&camp=1789&creative=9325&creativeASIN=B00062ZING&linkCode=as2&tag=tsig-20&linkId=UWOJ4FPGWYVLFZXN
I think I got the blue fuel line here: ombwarehouse.com
Hi,
Great build! I am in the process now and noticed the fork hits the frame when you turn it to the right or left completely. I see you have maybe some rubber pieces to help prevent paint damage. What did you use for this? Any help is appreciated!
Thank you!!
Steve
Sorry Steve. I didn’t see this comment earlier. I used some small plastic caps that are meant for the feet of a metal chair. I cut off the bottom leaving a ring, then split that and wrapped it around the frame with some double stick tape. You can find those in the hardware store where all the felt pads, etc. are.
Hi, nice build.
Are you able to remove the fuel tank filler cap or is the frame in the way on this frame/engine combo.
Thanks!
Hey Jeff, There’s not much room but it’s not a problem to remove the cap, or fill the tank. I have the non-hemi Predator 212. The hemi version has a thicker gas cap and I’ve seen people mention that they had to replace the cap on those. I also have a hemi Predator sitting around for another project, but I haven’t tried it in this frame. The cap is definitely thicker. Good luck!
Tracy! Good to see your minibike on YouTube. I too ended up with a crappy Azusa from some kids in Sacramento that tortured it for awhile. Yes, those footpegs are pathetic. I too bought a Predator for it. I’m completely stripping down the frame and forks, cleaning it up and getting it powder coated. Love your exhaust and it sounds good too! I’m hoping to end up with the same machine you have. I’d also really like to go with a disk brake. Please send me an email… I’m also on OMB as Weav
Thanks for your note, Fred!
Which exhaust did you go with and where from? I have purchased 2 exhausts now and the both butt up against the frame at the exhaust end, meaning they wont work. thx.
Hey LR, This is the matching part number. Hope it helps. https://www.ombwarehouse.com/narrow-frame-pipe-clamp-on-muffler.html
Hello Tracy, Thanks for the great site on the Azusa Minibike. I have referenced it often during my assembly. I have a question regarding the rear drum brake assembly. I am having a lot of trouble getting the unit to adjust at all in order to make it function. One thing of note when assembling it I noticed when rotating the wheel it seem to hit the internal drum during part of the wheel rotation like the drum has poor runout or high spots. Did you experience any of this and do you have any suggestions? Thanks, Ivan
Hey Ivan, Yes Azusa is not exactly manufacturing to six sigma standards. ;) I was having a similar problem. I’ll be honest that my brakes don’t perform that well, but I got them to work well enough. There is a lot of discussion about this at the OMB forums. The simplest solution I’ve seen is to tie or tape down the brake lever before tightening the axle nuts. With the brakes “on” it helps everything stay relatively concentric until it’s locked down. It’s been a while but I believe that’s all I did to get mine set up. Thanks for your note!
https://www.oldminibikes.com/forum/forum.php
Hey Tracy,
Nice job. Ur still getting comments even though you build this a few years back.
I’m with you. I would not buy an Azusa kit again. The parts are cheap.
I also was having problems with the drum brake and sprocket. The sprocket is not flush. I’m going to try and flatten it out to see if that helps. I also noticed a slight lip inside the drum brake. I’m going to take a dremel to the lip to see if that helps with the rubbing issues.
You did a great job and I like your youtube video.
thanks
Hey Colin, Good luck on the brakes. Thanks for your note!